

Table of Contents
- Step 1: Identify Your Fire Helmet Front Piece Attachment System
- Step 2: What You'll Need Before You Start
- What You'll Need
- Step 3: Follow Fire Helmet Manufacturer Instructions
- Step 4: Remove Fire Helmet Front Piece Screws Safely
- Step 5: Fire Helmet Front Holder Installation and Reinstallation
- Common Mistakes to Avoid When Removing Fire Helmet Front Pieces
- Frequently Asked Questions
Last Updated: October 7, 2026
Step 1: Identify Your Fire Helmet Front Piece Attachment System
Learning how to safely remove fire helmet front pieces starts with one question: how is yours attached? Get this wrong and you risk cracking a screw head, bending a holder, or scratching the shell.
A fire helmet front piece is the shield or plate mounted at the front of the helmet that carries your identification. It sits in a front holder that connects to the shell in one of a few ways.

Most leather and traditional helmets use one of two systems:
- Screw-mounted holders, fastened with small brass screws or rivets
- Slide-in or clip-on holders, held by tabs, clips, or a friction channel
Screw-Mounted Front Holders
Screw-mounted holders use two or more small fasteners, often brass, that pass through the holder into the shell or a bracket. Brass is soft, good for the helmet, bad for a rushed hand.
Look for screw heads on the face of the holder or just behind the brim. If you see them, stop and read Step 3 before touching a tool.
Slide-In and Clip-On Holders
Slide-in holders sit in a channel and lock with tabs or a spring clip; clip-on holders snap over a bracket. Both come off with hand pressure, no tools.
Never assume a holder is screw-mounted just because it looks solid. Press gently on the tabs first. If it moves, you have a clip-on.
Step 2: What You'll Need Before You Start
Gather your tools before you touch the helmet. Working one-handed while hunting for a screwdriver is how screws get lost and shells get scratched.
Total Time: 15-20 minutes Difficulty: Beginner
Match Your Tools to Your Attachment System
Pull out only the tools your Step 1 identification calls for:
- Screw-mounted holder: a hollow-ground or parallel-tip screwdriver in the exact size that fills the slot, a small cup or magnetic tray, and a soft cloth. A driver that rocks in the slot is the wrong size.
- Slide-in or clip-on holder: no tools at all. Your hands are the tool. A plastic trim tool can help release a stiff tab, but only if the manual shows one.
- Riveted holder: a rivet-specific tool only if the manual calls for it. Most riveted front holders are not field-serviceable, and drilling one out is a shell-damage risk, not a repair.
Tools and Methods to Avoid
Some forum methods cause more damage than the stuck part they were meant to free:
- Power drivers and drills. They spin too fast for small brass hardware and strip the head before you feel resistance.
- Prying with a flathead, knife, or key. Prying lifts the holder unevenly and cracks plastic brackets or tears leather tabs.
- Heat, open flame, or a heat gun. Heat warps thermoplastic shells and dries leather.
Contamination Handling Before You Start
Fire helmets pick up soot, ash, and debris on the job. Before any bench work, contain contamination:

- Put on nitrile gloves before you touch the helmet.
- Work over a disposable pad or dedicated bench mat, not a kitchen or living surface.
- Keep a sealable bag nearby for removed hardware and any part you decide to replace.
If the helmet saw heavy fire exposure, follow your department's decontamination procedure before you remove anything. The Centers for Disease Control and Prevention publishes guidance on cleaning and disinfecting personal protective equipment after exposure.
What You'll Need
- A clean, soft work surface, like a towel or foam pad
- The correct screwdriver size for your fasteners
- A small cup or magnetic tray for screws and rivets
Step 3: Follow Fire Helmet Manufacturer Instructions
Manufacturer instructions override every general guide, including this one. Helmet makers design their own attachment systems, so confirm this procedure against your manual.
Find the Right Manual Section
Look for the section titled front holder, front shield, or front piece. If the manual only covers the suspension and shell, call the manufacturer or your safety officer before touching a tool, never substitute a forum post or video.
Here is what to look for in the instructions:
- The exact fastener type and size
- Whether the holder is removable at all
- Any parts that must not be reused
A Model-Qualified Removal Sequence
Use this as a checklist, not a substitute for your manual. Stop wherever your manual differs.
- Confirm the attachment type using Step 1. Screw-mounted, slide-in, clip-on, and riveted holders each take a different path.
- Confirm the holder is field-removable. Some holders are riveted or bonded at the factory and are not meant to come off in the station.
- Set up your clean, padded surface and your contamination controls from Step 2.
- For screw-mounted holders: support the holder with one hand, seat the correct screwdriver fully, and turn counterclockwise with steady pressure. Set each screw in your tray the moment it comes free.
- For slide-in or clip-on holders: press the tabs or release clip and slide the holder out toward the brim. Your manual shows the exact direction.
- Lift the holder straight off once all fasteners are out. Keep it flat so a screw cannot drag across the shell.
- Inspect before you set anything down. Check the holder, fasteners, and the shell around each hole.
Stop Conditions
Stop and consult your manual or department safety officer if any of these are true:
- A screw will not turn with steady hand pressure.
- A screw head is already stripped, rounded, or cracked.
- The holder flexes or cracks when you press the tabs.
- The shell shows cracks, elongation, or delamination around a fastener hole.
A stuck screw is a signal, not a challenge. Forcing it turns a five-minute job into a shell repair.
Post-Removal Inspection
Before the helmet goes back into service, check these parts:
- Screw threads for stripping or cross-threading
- Holder tabs and clips for cracks
- The shell around each hole for cracks or elongation
- Leather for tears at the attachment points
Replace any damaged hardware. Worn brass screws are cheap to swap and expensive to strip. If the shell itself is cracked or the hole is elongated, take the helmet out of service and have it evaluated, do not reinstall the holder over damage.
The National Fire Protection Association sets the standards that govern fire helmet care and inspection. Your department's rules may add requirements on top of those standards.
Step 4: Remove Fire Helmet Front Piece Screws Safely
Screw removal is where most damage happens, and it is almost always avoidable. Slow, steady pressure beats force.
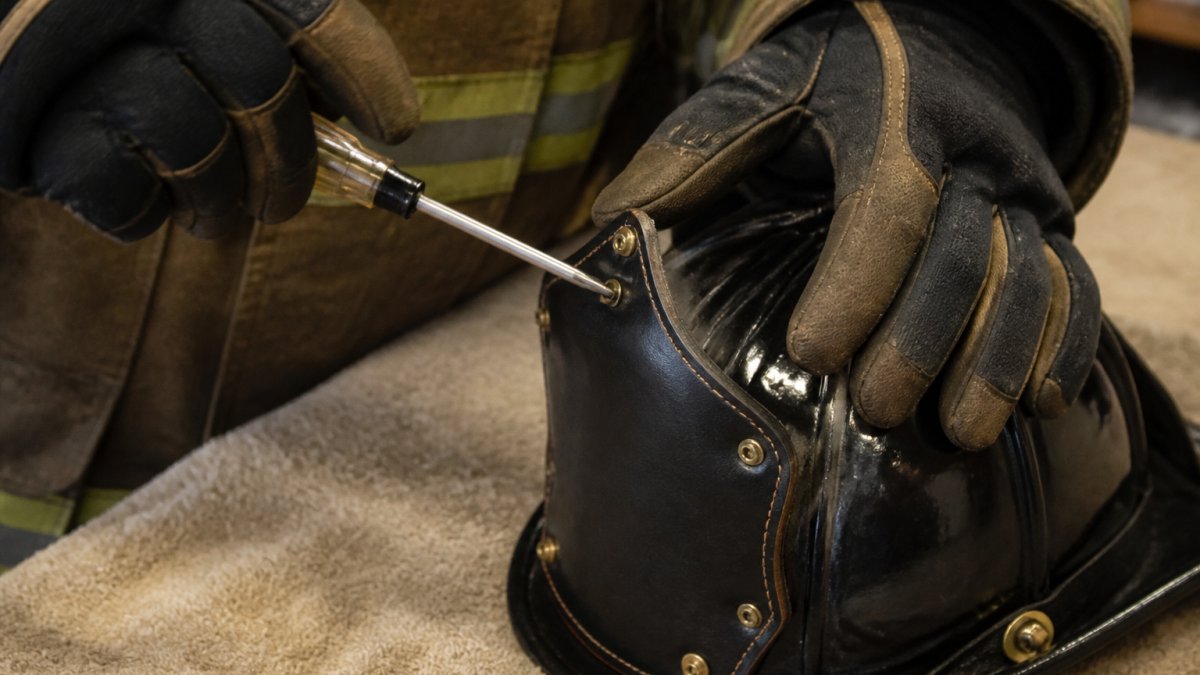
Work through these steps in order:
- Lay the helmet on its side on your padded surface.
- Support the holder with one hand so it cannot twist.
- Seat the screwdriver fully in the slot before turning.
- Turn counterclockwise with steady pressure, not speed.
- Set each screw in your tray the moment it comes free.
- Lift the holder straight off once all fasteners are out.
If a screw will not turn, stop, forcing it strips the head, a much bigger job than a stuck one. A drop of manual-approved lubricant and a few minutes often frees it.
If your holder is a slide-in type, skip the screwdriver. Press the tabs or release clip and slide the holder out toward the brim. Your manual shows the exact direction.
Step 5: Fire Helmet Front Holder Installation and Reinstallation
Reinstallation is the reverse of removal, plus inspection.
Check these parts before anything goes back on:
- Screw threads for stripping or cross-threading
- Holder tabs and clips for cracks
- The shell around each hole for cracks or elongation
- Leather for tears at the attachment points
Replace any damaged hardware. EH Coverings carries Brass Hardware as a set of five loose brass rivets for front holders and crowns, made from All American material.

For a clean, classic look, the All American Brass Front Holder fits MSA and E.H.
If you want something with more character, Carved Front Holders for Service let you upgrade an in-service helmet without breaking the bank.
| Step | Action | Time | Watch For |
|---|---|---|---|
| 1 | Inspect hardware and shell | 3-5 min | Cracks, stripped threads |
| 2 | Seat the holder on the shell | 2 min | Tabs aligned, no pinching |
| 3 | Start screws by hand | 3 min | Cross-threading |
| 4 | Tighten evenly, snug only | 2 min | Over-tightening brass |
| 5 | Check fit and function | 2 min | Movement or rattle |
Start every screw by hand. Turn it backward until you feel it drop into the existing thread, then turn it forward.
Common Mistakes to Avoid When Removing Fire Helmet Front Pieces
Most damage during front piece removal comes from five repeatable errors, each easy to avoid once you know it.
- Using the wrong screwdriver size. A loose fit chews up the slot. Match the tip to the screw.
- Reaching for power tools. The speed strips soft brass before you feel resistance.
- Skipping the manual. Model-specific steps exist for a reason.
- Losing the hardware. A tray costs nothing. Replacement screws and a trip to the bench cost time.
There is also a contamination angle that many guides skip. Fire helmets pick up soot, ash, and other debris on the job. The Centers for Disease Control and Prevention publishes guidance on cleaning and disinfecting personal protective equipment after exposure.
Handle a contaminated helmet with gloves, wipe the holder and shell before working on them, and wash your hands after. Keep removed parts off food surfaces and away from living areas.
Removing a fire helmet front piece is a 15-20 minute job when you match your method to your attachment system and follow the manual. Browse our Carved Front Holders for Service and All American Brass Front Holder, then add to cart and get your helmet back on the line.
Frequently Asked Questions
How do you remove a front piece from a fire helmet?
First identify the attachment system by checking your fire helmet manufacturer instructions. For screw-mounted holders, use a correctly sized screwdriver to loosen and remove the fire helmet front piece screws, then gently pull the front holder away from the shell. For slide-in holders, push the tabs and slide the holder out. Always work slowly to avoid scratching the helmet shell or damaging the front holder.
What tools do you need to remove a fire helmet front piece?
Most fire helmet front piece removals require only basic tools: a correctly sized screwdriver (Phillips or flathead), a soft cloth to protect the shell, and a small container for loose brass hardware. Never use power tools, pry bars, or excessive force. If your helmet uses a proprietary fastener, check the manufacturer instructions or contact the helmet maker for the correct tool.
Can removing a fire helmet front piece damage the helmet?
Removing a front piece does not damage the helmet if you follow the manufacturer instructions and use the correct tools. Damage happens when people force stuck screws, use the wrong screwdriver size, or pry against the shell. Inspect the front holder and screws for stripped threads or cracks after removal. If the shell itself shows cracks or delamination, stop and have the helmet inspected by a qualified professional.
How do you reinstall a fire helmet front piece securely?
Fire helmet front holder installation reverses the removal steps. Align the holder with the mounting holes or slide it back into the track until it clicks or seats fully. Hand-tighten screws in a cross pattern so the holder sits evenly. Do not overtighten, as this can crack the holder or strip the shell threads. After installation, tug gently on the front piece to confirm it is secure before returning the helmet to service.