

Table of Contents
- What You'll Need Before Starting
- Preparation and Stripping the Old Finish
- Structural Repairs and Crack Filling
- Brim Straightening and Shaping
- Fire Helmet Shield Repair Tools and Hardware Replacement
- Priming and Base Coat Application
- Painting and Color Matching Your Vintage Shield
- Leather Fire Helmet Maintenance and Long-Term Preservation
- Frequently Asked Questions
Last Updated: October 4, 2026
What You'll Need Before Starting
Gather safety gear (gloves, eye protection, dust mask) and ensure good ventilation before starting your leather fire helmet shields restoration.
For the actual restoration, you'll need:
- 80, 120, and 220-grit sandpaper
- Auto-body filler for cracks
- Epoxy primer
- Topcoat paint matched to your helmet color
- Leather conditioning cream
- Brass hardware and rivets (EH Coverings offers quality brass hardware sets starting at $6.00)
- Stainless steel wire for restitching if needed
- Soft brushes for paint application
Preparation and Stripping the Old Finish
Proper preparation is critical, most restorations fail when this step is skipped or rushed.

Use 80-grit sandpaper to strip the old finish, working in circular motions. Clean thoroughly with warm water and mild soap, then dry completely. For rust, use a wire brush or rust converter. Inspect the leather for soft spots, deep cracks, or separation from the shell before proceeding.
Structural Repairs and Crack Filling
Assessing Shell Integrity
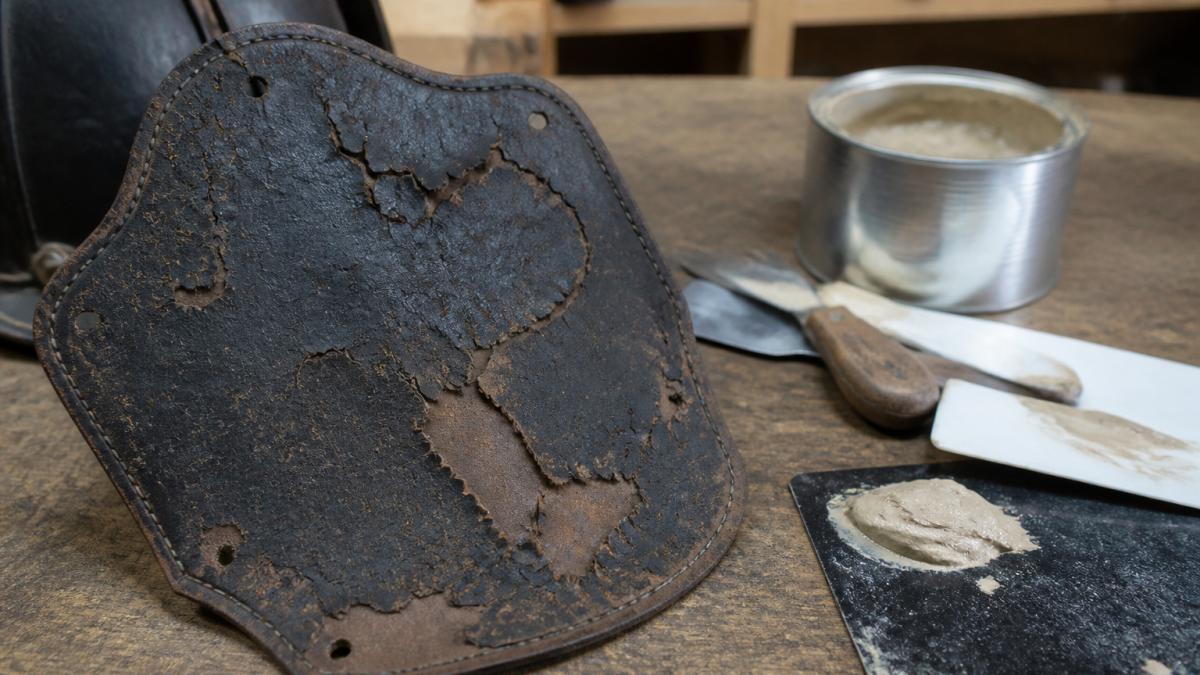
Press gently on the shield to check for soft areas or movement indicating lost integrity. Small hairline cracks can be filled and sealed; deep cracks through the entire shell require epoxy reinforcement.
Filling Cracks and Delamination
Mix auto-body filler per package directions and apply with a plastic spreader, pressing it deep into cracks. Overfill slightly. Once dry (typically 30 minutes to 1 hour), sand with 120-grit until level, then 220-grit for a smooth finish.
For delamination, the process is more involved. If the leather has separated from the shell, inject epoxy adhesive between the layers using a small syringe or applicator. Press the leather back down and wipe away excess adhesive. Clamp or weight the area while it cures, usually 24 hours.
Brim Straightening and Shaping
Use a heat gun on low setting (6-8 inches away) to warm the leather, then gently press the brim flat with a wooden block. Let it cool in place to hold the new shape. Repeat for severe warping. Light sanding can feather permanent creases.
Fire Helmet Shield Repair Tools and Hardware Replacement
Replacing Worn Brass Hardware
Brass hardware on vintage shields often shows corrosion or wear. Replacing it restores both function and appearance.
Most shields use brass rivets to attach the front holder and reinforce seams. If rivets are loose or corroded, drill them out carefully. Use a drill bit slightly smaller than the rivet diameter and go slowly, you want to remove the rivet without enlarging the hole.
EH Coverings provides replacement brass hardware sets designed to fit industry-standard helmets including MSA, Cairns, and Morning Pride models. These sets include loose rivets for both front holders and crown attachment points.
To install new rivets, align the hardware and insert the rivet through the hole. On the back side, use a rivet tool to set it. If you don't have a rivet tool, a hammer and a small punch work in a pinch, strike the punch gently and evenly to flatten the rivet end.
Clean new brass with a soft cloth before installation. This prevents oxidation and keeps the hardware looking sharp.
Upgrading the Front Holder
The front holder is the most visible hardware on a fire helmet shield. Many vintage shields have holders that are bent, corroded, or simply outdated.
Replacing the front holder is straightforward. Remove the old one by drilling out its rivets, then install a new holder using the same holes. If the holes have enlarged or shifted, you may need to drill new ones nearby.
EH Coverings offers carved front holders for service at $45.00 each. These brass holders are made in America and designed to fit standard helmet shells without modification. Many feature carved designs that add character while maintaining a professional appearance.

Priming and Base Coat Application
With the shield repaired and shaped, priming is critical, but primer choice directly affects long-term durability, especially on vintage leather that may have been treated with older tanning compounds incompatible with modern products.
Primer Selection and Leather Compatibility
Not all primers adhere equally to aged leather. Vintage fire helmet shields, particularly those manufactured before 1980, often used vegetable-tanned leather treated with oils or waxes that modern primers may not bond to effectively.
Epoxy primers designed for composite surfaces (fiberglass, Kevlar, or modern leather) work best on shields where the original finish has been fully stripped. If any old finish remains, even a thin layer, epoxy primers may fail to adhere, leading to peeling within months of field use.
For shields with stubborn old finishes or uncertain leather origin, use a primer with built-in adhesion promoters. These primers chemically bond to aged leather and old paint residue, creating a mechanical lock that prevents failure. Spray primers with adhesion promoters cost slightly more but eliminate the risk of primer failure that requires complete re-stripping.
All In One Liquid Decon Soap →
Test primer compatibility before committing to the full shield. Apply primer to a small, inconspicuous area (the back edge or underside of the brim). Let it cure fully per manufacturer instructions, typically 24 hours, then attempt to peel or scratch it off. If it comes away easily, the primer is not compatible with that particular shield's leather composition. Switch to a different primer formulation and retest.
Application Technique and Curing
Use spray primers in two thin coats, waiting 4-6 hours between coats. The first "tack coat" should be light enough to see the shield through it. Allow full cure (typically 24 hours at 70°F, longer in cold/damp conditions). Once cured, sand lightly with 220-grit sandpaper and wipe with a tack cloth to remove dust before topcoating.
Identifying and Fixing Primer Problems
Sand drips smooth with 120-grit, feather edges, and apply a thin primer coat to the repair. For thin spots, apply a third coat to those areas only. For orange peel texture, sand with 220-grit (or 120-grit first if severe). Proper primer application is critical.
Painting and Color Matching Your Vintage Shield
Paint selection involves two decisions: historical accuracy and functional durability. These goals sometimes conflict, and understanding the trade-off is essential before you commit to a color and paint type.
Authenticity vs. Modernization: Choosing Your Approach
Vintage fire helmet shields were painted with products available at the time of manufacture. A shield from 1965 likely received a lacquer-based enamel that was standard then but is difficult to match today. A shield from 1995 may have received acrylic latex or polyurethane, products still in use.
If your goal is historical authenticity, research the specific helmet model, manufacturer, and year. Fire service history resources, including the International Fire Service Training Association and manufacturer archives, document standard colors for different eras and departments. A Cairns helmet from 1970 typically came in traditional red; a Morning Pride helmet from 1985 might have been white or black depending on the purchasing department's preference.
Matching historical paint requires either finding original paint stock (rare and expensive) or having a custom color mixed. Many automotive paint suppliers can match vintage fire service colors if you provide a reference photo or a paint chip from the original shield. Expect to pay $40-80 for a custom color match and small quantity of paint.
If your goal is modernization for field use, prioritize durability and UV resistance over historical accuracy. Modern polyurethane and epoxy-based paints resist weathering, UV fading, and impact damage far better than vintage lacquers or enamels.
Paint Type Selection and Durability Trade-offs
Acrylic Latex: Water-based, easy cleanup, moderate UV resistance (3-5 years). Best for indoor storage or occasional use. Polyurethane: Two-part, excellent adhesion and gloss retention, superior UV resistance (10+ years). Standard for active field use. Epoxy: Two-part, hardest finish, most difficult to apply. Best for heavy use or harsh conditions.
Color Research and Verification
Verify your target color through manufacturer documentation, fire service history groups, reference photos, or paint chip comparison from a period-correct shield. Do not rely on memory, historical accuracy requires documentation.
Application Technique for Professional Results
Apply 2-3 thin coats, allowing drying time between each. For spray application, hold 8-10 inches away in smooth, overlapping passes. Spray is preferred over brush for professional appearance. Allow full cure before field use: 7 days for polyurethane, 3-5 days for acrylic latex.
Protective Sealant and UV Protection
Apply a UV-protective clear sealant after the final paint coat dries. This extends color retention. Allow 48-72 hours for full cure before field use.
Leather Fire Helmet Maintenance and Long-Term Preservation
Conditioning and Protective Sealant Application
Condition the leather every 6-12 months with a quality conditioner applied in circular motions. Let it soak 10-15 minutes, then buff away excess. Follow with a protective sealant to create a water-resistant barrier.
Restitching and Suspension System Care
Restitch loose seams using waxed thread and a curved needle, stitching through existing holes when possible. Check suspension straps for cracks or loose rivets; tighten or replace as needed. Inspect your shield quarterly during active use to catch problems early.
Restoring vintage leather fire helmet shields is a rewarding project that preserves equipment built to last a career. The work requires patience and the right materials, but the results speak for themselves, a shield that looks professional and performs reliably.
EH Coverings supports your restoration with quality American-made brass hardware, replacement front holders, and all-in-one decon soap to keep your gear clean and protected. Our products are designed to fit industry-standard helmets and built to withstand the demands of active fire service. Start your restoration project with confidence, knowing you have the right tools and support behind you.
Frequently Asked Questions
What kind of paint is safe to use on a leather fire helmet shield?
Use paint formulated for leather surfaces or flexible topcoats designed for protective equipment. Acrylic latex paints work well but may crack as leather flexes; consider urethane-based finishes for better adhesion and durability. Always apply primer first to ensure paint bonds properly. Test any paint on a small, hidden area before full application to confirm compatibility with your vintage shield's leather and finish.
How do you clean and condition old, cracked leather fire helmet shields?
Start by removing surface dirt with a soft brush, then clean with a gentle leather cleaner or saddle soap. For deep cleaning after restoration, EH Coverings' All In One Liquid Decon Soap removes contaminants and odors while conditioning with aloe vera, coconut oil, and olive oil. After cleaning, apply a leather conditioner to restore suppleness. Follow with a protective sealant to prevent future cracking and delamination, especially if the shield will see active duty.
Can you recertify a leather fire helmet after restoration?
Recertification depends on your department's inspection standards and the extent of restoration. Structural repairs, paint, and conditioning typically don't prevent recertification if the shell integrity remains sound and all hardware is secure. However, major structural damage or replacement of critical components may require department approval or testing. Check with your fire service's gear inspection protocol before restoring a helmet intended for fireground use, as vintage shields may not meet current safety standards.
What is the best epoxy or adhesive for repairing leather fire helmet components?
Two-part epoxy formulated for leather and flexible materials works best for bonding cracked sections and delaminated layers. Auto-body filler can reinforce larger cracks from the inside before applying adhesive. For restitching torn leather, use waxed thread and a saddle stitch for durability. Ensure any adhesive you choose cures fully before sanding or painting, and verify it remains flexible after curing so it moves with the leather without cracking again.