

Table of Contents
- Why Proper Fire Helmet Accessory Fit Matters
- What You'll Need Before Starting
- Step 1: Inspect the Helmet Shell and Mounting Points
- Step 2: Verify NFPA 1971 Helmet Accessory Compliance
- Step 3: How to Inspect Fire Helmet Suspension and Adjust Tension
- Step 4: Fire Helmet Accessory Installation Guide for Chin Straps and Clips
- Step 5: Test Fit and Perform the Final Security Check
- Common Fit Verification Mistakes to Avoid
- Frequently Asked Questions
Why Proper Fire Helmet Accessory Fit Matters
Proper fire helmet accessory fit isn't just about comfort, it's about safety and performance when it matters most. A chin strap that shifts during intense heat exposure, a suspension system that doesn't distribute weight evenly, or mounting hardware that fails under stress can compromise your protection in critical moments. When responding to a structure fire or working in hazardous conditions, your helmet needs to stay exactly where it should be. Loose accessories create distraction and risk, while improperly tensioned suspension systems cause neck strain and fatigue.
This guide walks you through the complete verification process: inspecting your helmet shell and mounting points, verifying NFPA 1971 compliance, adjusting suspension tension correctly, installing chin straps and clips properly, and performing final security checks. By the end, you'll have a systematic approach to ensuring every accessory on your helmet is secure, compliant, and ready for duty.
What You'll Need Before Starting
Gather these items before you begin:
Essential inspection tools:
- Flashlight or headlamp
- Magnifying glass
- Measuring tape
- Ruler or straightedge
- Your helmet's original documentation or spec sheet (if available)
Reference materials:
- NFPA 1971 standard documentation (available through National Fire Protection Association)
- Your helmet manufacturer's specifications and installation guides
- Any original equipment manufacturer (OEM) accessory documentation
Replacement components (if needed during inspection):
- Replacement suspension tabs (like the Suspension Tabs available from EH Coverings)
- Extra chin strap hardware or clips
- Retroreflective trim or decals (if damage is found)
A clean, well-lit workspace and workbench prevent accidentally dropping your helmet during inspection. Allow 30-45 minutes for a thorough verification.

Step 1: Inspect the Helmet Shell and Mounting Points
Start with a visual inspection of the helmet shell. Look for visible cracks, deep gouges, or areas where the shell material shows signs of impact damage. Even small cracks can compromise the helmet's ability to absorb impact. Run your hands across the entire outer surface, feeling for irregularities or areas where the shell feels soft or compromised.
Pay special attention to mounting points where accessories attach. These areas experience repeated stress and are prime locations for damage. Check the front where identification shields attach, the sides where chin strap clips mount, and the back where rear-mounted accessories connect. Each mounting point should feel solid with no signs of cracking around attachment holes.

Use your flashlight to inspect the interior of the helmet shell for cracks, delamination, or deteriorating interior surface. NFPA 1971 standard requirements specify that helmet shells must maintain structural integrity. If you find cracks larger than hairline or deep gouges exposing underlying material, the helmet should be retired or professionally repaired before adding accessories.
Check that all existing mounting holes are clean and free of debris. Damaged or enlarged mounting points prevent accessories from sitting securely. This is one of the most common reasons why accessories don't fit properly.
Step 2: Verify NFPA 1971 Helmet Accessory Compliance
NFPA 1971 standard compliance is non-negotiable for fire service gear (nfpa.org). Before installing any accessory, verify that both the accessory and helmet meet current NFPA 1971 standards.
Check your helmet's certification marking, typically found on the interior shell, which includes the manufacturer's name, standard year, and certification number. Write down this information, it tells you which version of the standard your helmet meets.
Verify that any accessories you plan to install are NFPA 1971 compliant. This information should be on the accessory packaging or in manufacturer documentation. If an accessory doesn't clearly state NFPA compliance, contact the manufacturer before installation.
Pay attention to accessory mounting hardware specifications. NFPA 1971 compliance includes requirements for how accessories attach to the helmet. Hardware must be corrosion-resistant and designed to withstand forces during impact and heat exposure.
Check that the accessory doesn't interfere with other helmet components. NFPA 1971 requires that accessories maintain the helmet's protective capabilities. EH Coverings' accessories are designed to fit MSA, E.H. Coverings, Cairns, and Morning Pride helmets while maintaining full compliance with safety standards.
Document your compliance verification by photographing certification markings and keeping manufacturer documentation. This protects you by providing evidence that your equipment meets required safety standards.
Step 3: How to Inspect Fire Helmet Suspension and Adjust Tension
The suspension system positions your helmet correctly and distributes impact forces. Proper tension keeps the helmet stable during movement and absorbs shock during impact.
Examine the suspension tabs that attach the suspension system to the helmet shell. These tabs should be firmly attached with no movement or looseness. If tabs are cracked, broken, or pulling away, they need replacement. The Suspension Tabs from EH Coverings are designed to replace worn or damaged tabs without requiring major helmet restoration.
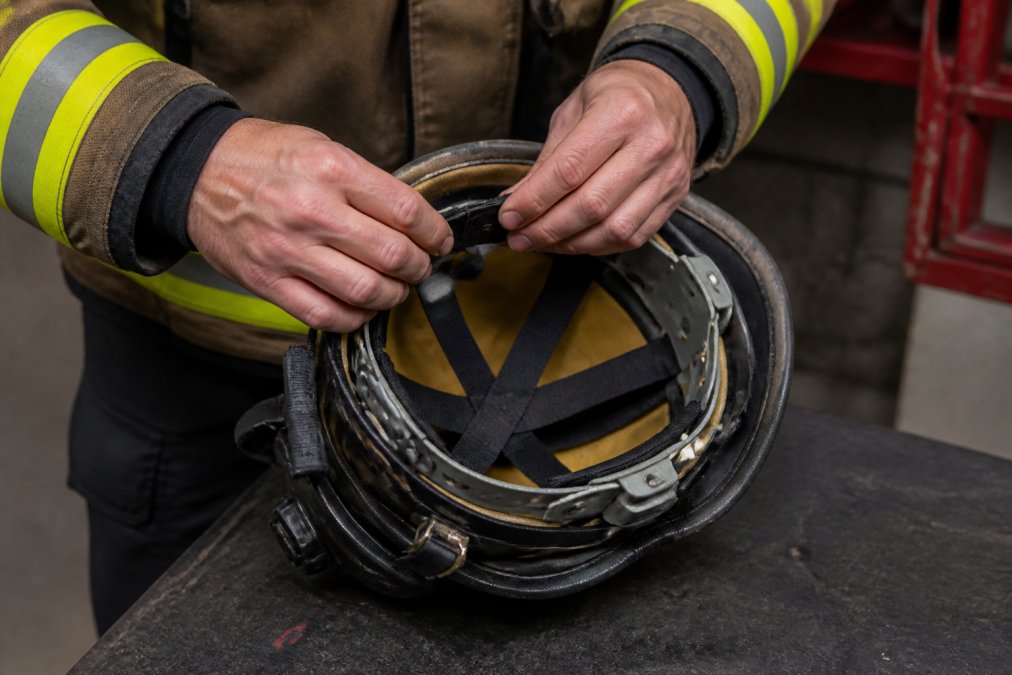
Inspect the elastic bands and cradle. The elastic bands should be intact with no tears or permanent stretching. The cradle should sit evenly inside the helmet with no twisting or misalignment. Press gently on different areas, it should feel firm but slightly flexible.
Check the headband circumference by measuring around the suspension system at the point where it contacts your head. This measurement should match your helmet's specifications. If too large, the helmet will shift during movement. If too small, you'll experience pressure points and discomfort.

Adjust tension by working with the suspension tabs and elastic bands. Make small adjustments and test the fit between changes. The goal is even pressure distribution without any single pressure point.
Perform the tension test: place the helmet on your head and move it side to side and forward and backward. The helmet should move slightly with your head but not shift independently. If it moves freely, increase tension. If you feel pressure points, decrease tension slightly.
Step 4: Fire Helmet Accessory Installation Guide for Chin Straps and Clips
Chin strap installation is where many fit problems occur. A properly installed chin strap keeps your helmet secure during intense activity and prevents shifting or falling off.
Identify the correct mounting points on your helmet, typically located on the lower sides just above your jaw line. Check that these mounting points are clean, undamaged, and properly threaded. If stripped or damaged, they need repair before installation.
Select the correct chin strap for your helmet model. The Chin Strap from EH Coverings is designed to work with standard fire helmets. Measure the distance between your helmet's mounting points to ensure the strap length is appropriate.

Install mounting clips at each end of the chin strap. The Chin strap clips from EH Coverings are designed to secure the strap to the helmet's mounting points while allowing proper tension adjustment. Insert the clip hardware through the strap attachment holes, then secure to the helmet mounting points using stainless steel bolts or screws that resist corrosion.
Tighten hardware evenly on both sides. If one side is tighter than the other, the chin strap will pull to one side and create uneven pressure. The hardware should be snug enough that the strap doesn't move when you pull on it, but not so tight that you strain the strap material or mounting points.
Adjust chin strap tension by working with the strap material itself. The strap should sit comfortably under your chin without digging in. When you move your head side to side, the strap should stay in place without shifting. If the strap slides or feels loose, tighten the mounting hardware slightly.
Step 5: Test Fit and Perform the Final Security Check
After all adjustments are complete, perform a comprehensive test fit. Put on your helmet and move through a range of motions that simulate actual duty conditions.
Test basic movement by turning your head side to side, nodding forward and backward, and tilting your head in all directions. The helmet should move with your head without shifting independently. Accessories should remain exactly where they're mounted with no rattling or movement.
Test the chin strap security. With the helmet on your head, try to lift the helmet upward using the chin strap. The helmet should resist lifting and stay firmly on your head. The chin strap should not dig into your skin or cause discomfort.
Check all mounting points for tightness by systematically verifying that every accessory mounting point is secure. Gently tug on each accessory, nothing should move or shift. Check that bolts and screws haven't loosened during testing.
Verify that all accessories are positioned correctly and not interfering with other helmet components. Perform a final visual inspection in a mirror to verify that all accessories are positioned professionally and securely.
Document your verification by taking photos of the completed installation and recording the date of verification and any adjustments you made.
Common Fit Verification Mistakes to Avoid
The most common mistake is skipping the suspension system inspection. Firefighters often focus on visible accessories while overlooking the suspension system that actually holds the helmet in place. A poorly tensioned suspension system causes the entire helmet to shift during movement.
Another frequent error is using non-compliant hardware or improvised mounting solutions. Always use hardware and mounting solutions specifically designed for your helmet model.
Many firefighters adjust chin strap tension too tight, thinking this creates a more secure fit. Excessive tension causes discomfort and distraction during duty and can damage the strap material over time.
Failing to verify mounting point integrity before installation is another common mistake. If mounting points are damaged, new accessories won't sit securely no matter how tight you make the hardware.
Not testing the fit after installation is a critical oversight. The only way to verify that fit is correct is to wear the helmet and move through a range of motions.
Ignoring documentation and compliance requirements creates legal and safety risks. Always verify compliance and keep documentation of your verification.
Proper fire helmet accessory fit requires systematic inspection and careful adjustment, but the process becomes straightforward once you understand what to check. Your helmet is your most critical piece of protective equipment, and the accessories you add to it must be secure, compliant, and properly fitted. EH Coverings provides American-made suspension tabs, chin straps, and mounting hardware designed to fit standard fire service helmets while maintaining full NFPA 1971 compliance. Start with the verification process outlined in this guide, and you'll have confidence that your helmet and accessories are ready for duty.
Frequently Asked Questions
How do I check if my fire helmet accessory fit is correct?
Start by ensuring the helmet sits level on your head without tilting. The suspension system should rest about half an inch above your scalp. Chin straps must be snug but not cutting off circulation, and all accessories should be firmly mounted with no movement when you gently tug them. Verify all mounting hardware is secure and that accessories don't interfere with vision or hearing.
Does adding accessories to a fire helmet void NFPA 1971 compliance?
Not automatically, but only if the accessories meet NFPA 1971 standards and are installed correctly. Non-OEM accessories must not compromise the helmet's structural integrity, thermal performance, or impact protection. Before installing any accessory, check the manufacturer's compliance documentation and verify that mounting points don't create stress points or damage the shell. If you're unsure whether an accessory meets standards, contact the helmet manufacturer or consult NFPA 1971 guidelines directly. EH Coverings products are designed for compatibility with MSA, Cairns, and Morning Pride helmets while maintaining compliance.
What are the risks of improperly fitted helmet accessories?
Loose or incorrectly fitted accessories can shift during emergency operations, blocking vision or impairing hearing when you need them most. Poor chin strap tension can cause the helmet to slip off during movement or impact. Accessories mounted at wrong angles create pressure points that cause discomfort and distraction on long shifts. Worst case, accessories can detach and become hazards themselves. Improper fit also accelerates wear on both the helmet and accessory, reducing their protective lifespan and requiring premature replacement.
How can I ensure my helmet accessories are securely attached?
Inspect all mounting hardware monthly for corrosion, looseness, or damage. Tighten fasteners with appropriate tools, being careful not to overtighten and strip threads. Check that suspension tabs are properly seated and not bent or cracked. For chin straps, verify the elastic band hasn't lost tension and that clips grip the helmet firmly. After heavy use or exposure to heat and smoke, perform a full security check. EH Coverings Suspension Tabs and Chin Strap Clips are engineered for durability, but regular inspection ensures they stay secure throughout your career.
This article was written using GrandRanker