

Table of Contents
- Tools and Materials You'll Need for Installation
- Step-by-Step Guide: How to Install a Brass Front Holder
- Choosing the Best Fire Helmet Front Holders for Your Gear
- Maintaining Brass Fire Helmet Accessories for Long-Term Shine
- Helmet Compatibility and Fitment Guide
- Troubleshooting Common Installation Issues
- Safety and Reversibility: Protecting Your Helmet's Integrity
- Frequently Asked Questions
Last Updated: September 10, 2026
Tools and Materials You'll Need for Installation
Installing a brass front holder requires a small set of dedicated tools and hardware. Gather these before you start:

- Rivet squeezer or hand rivet tool for compressing brass rivets
- Drill with a bit sized to your rivet shank (typically 3/16 in.)
- Center punch to mark drill points and prevent bit walking
- Chicago screws as an alternative to rivets for reversible mounting
- Acorn nuts and washers to finish exposed fastener ends
- Polished brass front holder sized for your helmet model
- Rivet removal tool or drill for extracting old hardware
- Soft cloth and brass polish for final cleanup
A common mistake is buying hardware before confirming the holder fits your shell. Check compatibility first, then buy fasteners. The National Fire Protection Association overview of helmet standards is a useful reference for understanding what modifications are generally acceptable on structural fire helmets.
Step-by-Step Guide: How to Install a Brass Front Holder
A first-timer with the right tools can finish in about 20-30 minutes. The sequence runs removal, alignment, fastening, and a reversibility check in order, because steps 1 and 3 determine whether the job can be undone later without scarring the shell.
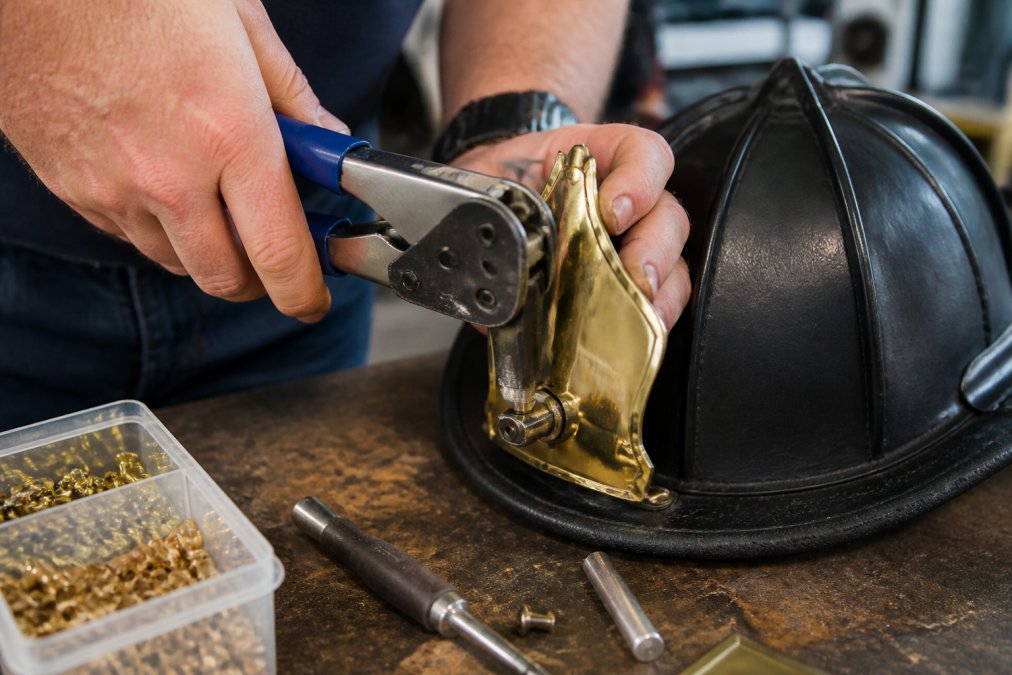
Step 1: Remove the Old Hardware and Prepare the Shell
Old front holders come off two ways: Chicago screws unscrew with a flathead driver; rivets require drilling out the head with a bit slightly larger than the shank, then punching the remainder through.
Work slowly, leather tears easily when a bit catches. Once the holder is off, wipe the mounting area and inspect for cracks or stretched holes. If the leather is soft or cracked around the old holes, mount the new holder slightly higher or lower to bite fresh material.
Damage-prevention specifics that most guides skip:
- Back the shell with a wood block or dense scrap leather before drilling. The backing stops blowout and keeps the hole round.
- Run the drill at low RPM with light pressure. High speed glazes the leather edge so it will not accept a rivet cleanly.
- If the old rivet spins, apply a drop of cutting oil and re-center the bit with a fresh center-punch mark.
- Photograph the mounting area before and after removal as a record of what was modified.
Step 2: Position and Align the Front Holder
Set the holder on the helmet and check alignment against the centerline. It should sit level, with the shield attachment point centered over the brow.
Mark drill points with a center punch. On a curved leather shell, the mounting holes rarely sit flush, so press the holder down firmly before marking. Drilling while the holder is loosely positioned produces holes that don't line up once it is pressed flat.
Two alignment checks that catch most errors before you drill:
- String-line check. Run masking tape down the centerline and confirm the mounting holes sit symmetrically on either side.
- Dry-fit with tape. Tape the holder in place, put the helmet on, and check a mirror. The brow line should sit level with your natural brow. If it tilts, the holder is rotated, not the helmet.
Step 3: Secure the Holder with Rivets or Chicago Screws
Rivets give a permanent, traditional look. Chicago screws allow removal later without drilling, which matters if your department restricts modifications.
For rivets: insert the shank through the shell, seat the washer, and compress with the squeezer until snug. Over-squeezing cracks the brass or deforms the leather. A properly set rivet holds tight with no gap between brass and leather, but the leather should not dimple.
For Chicago screws: thread both halves through the shell and tighten by hand. Add removable thread locker if they loosen with movement, never permanent thread locker, since you will need to remove the screw later.
Step 4: Reversibility Check Before You Walk Away
Before you call the job done, ask: if I had to remove this tomorrow, what would the helmet look like?
- Chicago screw mount: Remove one screw and inspect the hole. It should be clean, round, and the same diameter as when you drilled it. Compressed or shiny leather means you over-tightened.
- Rivet mount: You cannot remove a rivet without drilling, so this is a planning check. Confirm the rivet head sits flush, the washer is seated inside, and the hole is not oversized, an oversized rivet hole is the most common reason a later removal leaves a visible scar.
If you may need to reverse the install later, use Chicago screws at the two outer holes and a rivet at the center. The rivet holds the traditional look and center alignment; the screws let you remove the holder without drilling the outer holes.
Choosing the Best Fire Helmet Front Holders for Your Gear
The best fire helmet front holders balance fit, material, and finish. Fit matters most: a holder that doesn't match your shell's curve will sit crooked no matter how carefully you install it.
EH Coverings makes brass front holders designed to fit MSA and E.H. Coverings leather helmets, the TL2, Cairns 1010 and 1044, and Morning Pride Ben 2. Each is made from American material by American workers in an American factory, built to last the length of a career.
Options include the standard All American Brass Front Holder and the Black All American Brass, both at $65, plus a Customizable All American Brass at $75 for engraving or finish selection. Loose brass rivets for front holder and crown mounting are available as a set of five for $6.
| Option | Price | Best For |
|---|---|---|
| All American Brass Front Holder | $65 | Traditional polished brass look |
| Black All American Brass | $65 | Matte or gloss black finish to match department gear |
| Customizable All American Brass | $75 | Personalized engraving or finish choice |
| Brass Hardware (set of 5 rivets) | $6 | Replacement fasteners for front holder or crown cover |
Maintaining Brass Fire Helmet Accessories for Long-Term Shine
Brass holds up for decades, but it tarnishes without attention. A quick polish every few months keeps the finish bright and prevents surface corrosion from taking hold.

Wipe the holder with a soft cloth after each shift to remove soot and moisture. Use a non-abrasive brass polish for deeper cleaning, and avoid abrasive pads that scratch the surface. If your department issues a specific cleaning protocol, follow it. Many departments treat helmet cosmetics as part of uniform standards, and the Occupational Safety and Health Administration guidance on personal protective equipment outlines the broader expectations for keeping PPE in serviceable condition.
For black-finish holders, skip the polish. A damp cloth is enough, and abrasive cleaners will strip the coating.
Helmet Compatibility and Fitment Guide
Not every front holder fits every shell. Mounting hole spacing and curve vary between models, and a mismatch shows up as a crooked mount or misaligned holes. Measure first, order second.
How to Measure Your Helmet Before Ordering
You need two numbers and one curve check.
- Hole spacing. Measure center-to-center between the existing front-holder mounting holes with calipers or a steel rule. Record to the nearest 1/16 in.
- Brow height. Measure from the bottom edge of the shell to the center of the top mounting hole.
- Curve check. Lay a straightedge across the two mounting holes. The gap at the centerline is the shell's crown. A holder built for a flatter shell will rock on a deeply curved one.
If your helmet has no existing holes, you are drilling fresh, and the holder's own hole spacing becomes the template. In that case, the curve check matters most.
Compatibility Matrix
EH Coverings brass front holders are designed to fit the models below. If your helmet is not listed, measure before ordering.
| Helmet Model / Family | Typical Fit | Notes |
|---|---|---|
| MSA and E.H. Coverings style leather helmets | Direct fit | Standard leather-shell spacing |
| TL2 | Direct fit | Confirm brow height before drilling |
| Cairns 1010 | Direct fit | Leather shell; check for prior modifications |
| Cairns 1044 | Direct fit | Leather shell; check for prior modifications |
| Morning Pride Ben 2 | Direct fit | Confirm hole spacing on older production runs |
| Other leather shells | Measure first | Match hole spacing and curve, or use a shim |
| Non-leather / composite shells | Not recommended | Fastener and curve assumptions do not carry over |
If your helmet is not on that list, measure the existing mounting holes before ordering. If your department restricts modifications, confirm with your officer before drilling, a crooked holder or non-standard fasteners can fail an inspection.
What to Do If Your Helmet Is Not on the List
Three options, in order of preference:
- Match the holder to the shell. Order a holder whose hole spacing matches your measurement. This is the cleanest result.
- Shim the mount. A thin leather or rubber shim behind the holder corrects a curve mismatch without redrilling. Keep the shim no thicker than 1/8 in. so the fasteners still seat.
- Adapt the shell. Only as a last resort, and only if your department allows it. Drilling new holes to match a holder you already own is the least reversible option.
Troubleshooting Common Installation Issues
Most installation problems trace back to alignment, hole size, or over-tightened fasteners.
Holder sits crooked after mounting. The drill points weren't marked with the holder pressed flat. Fill the old holes with leather filler if the department allows, reposition, and re-drill. If the holes are too far off, a larger holder or a shim behind the mount can correct the angle.
Rivet won't compress flush. The shank is too long for the shell thickness. Trim the shank with side cutters and re-squeeze, or switch to a shorter rivet.
Chicago screw loosens with movement. Add a small amount of removable thread locker. Don't overtighten, since over-tightening compresses the leather and creates a permanent dent.
Hole drilled too large. A rivet with a wider head or a washer underneath the shell can salvage an oversized hole. If the hole is badly oversized, a leather patch behind the mount is the cleanest fix.
Safety and Reversibility: Protecting Your Helmet's Integrity
Every hole you drill is permanent unless you fill it. Reversibility matters because departments change gear policies, helmets get replaced, and a holder you love today may not be the one you want in five years.
Chicago screws preserve the most flexibility: remove the holder and the holes remain small and clean. Rivets are more secure but harder to reverse without visible marks.
Structural integrity is the other concern. A few small mounting holes in the brow area don't compromise a leather helmet's protection, but a cluster of oversized or poorly placed holes can weaken the shell. Drill the minimum, use the correct bit size, and never enlarge a hole to force a fit.
If you're restoring an older leather helmet, treat the shell gently. Aged leather is more brittle and less forgiving than new material, and the National Institute for Occupational Safety and Health firefighter safety resources covers broader firefighter PPE considerations worth reviewing before you modify retired gear.
Customizing a duty helmet is a personal decision, and getting the hardware right matters as much as the look. EH Coverings builds brass front holders from American material, designed to fit MSA, E.H. Coverings, Cairns, and Morning Pride helmets, and made to last the length of a career. Whether you're restoring an old leather helmet or setting up a new one, the right holder and fasteners make the job straightforward. Browse the brass front holder lineup and add to cart to get your helmet set up right.
Frequently Asked Questions
Do I need special tools to install a brass front holder?
You will need a drill with a bit sized for your rivets, a rivet squeezer or setting tool, and a screwdriver if you are using Chicago screws. A center punch helps mark drill spots accurately. For fire helmet hardware installation tools, most firefighters already own these basics. If you are using Chicago screws instead of rivets, you only need a screwdriver, making it a simpler job with no drilling required.
How do I ensure my brass front holder is centered on my helmet?
Measure from the center line of the helmet's front brim to each side and mark equal distances. Use a pencil or tape to temporarily hold the holder in place, then step back and check the alignment visually. A centered holder sits directly above the shield's midpoint. Taking a photo with your phone can help you spot any tilt before you drill. Proper alignment prevents an uneven look and keeps the holder from sitting crooked.
Can I install a brass front holder on any fire helmet model?
Most standard leather fire helmets accept brass front holders, but fitment varies by model. EH Coverings brass holders are designed to fit MSA, E.H. Coverings, Cairns 1010 and 1044, Morning Pride Ben 2, and TL2 helmets. Always check the product description for your specific helmet. If you have an older or unusual model, contact the manufacturer with your helmet's make and model to confirm compatibility before ordering.
How often should I check the hardware on my brass front holder?
Inspect the rivets, screws, and holder after every significant use or at least monthly. Look for loose fasteners, cracks around drill holes, or any movement in the holder. Brass hardware can loosen over time from vibration and impact. Tighten Chicago screws as needed and replace missing rivets immediately. Regular checks are part of maintaining brass fire helmet accessories and help prevent the holder from snagging or falling off during a call.